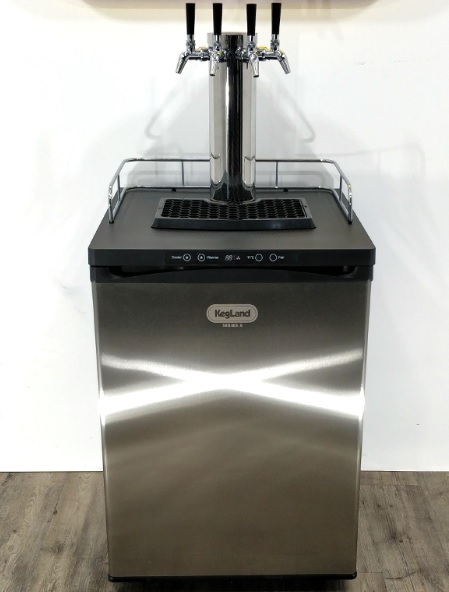
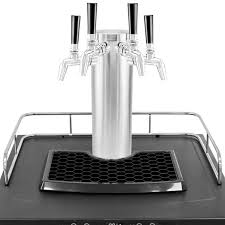
Designed to be the most cost effective, efficient and reliable kegerator with a 2-year warranty. Rated to Climate Class T so it can handle Australian weather. Compact, but can easily hold 1 x 50L commercial keg or up to 4 x 19L corny kegs!
YouTube video at https://www.youtube.com/watch?v=9Sfl-XLBcEI&embeds_referring_euri=https%3A%2F%2Fcdn.iframe.ly%2F&source_ve_path=OTY3MTQ
Dimensions
- 600mm wide
- 640mm deep
- 840mm high
- 890mm high with castors (fridge component only, not including font, guard rail or drip tray
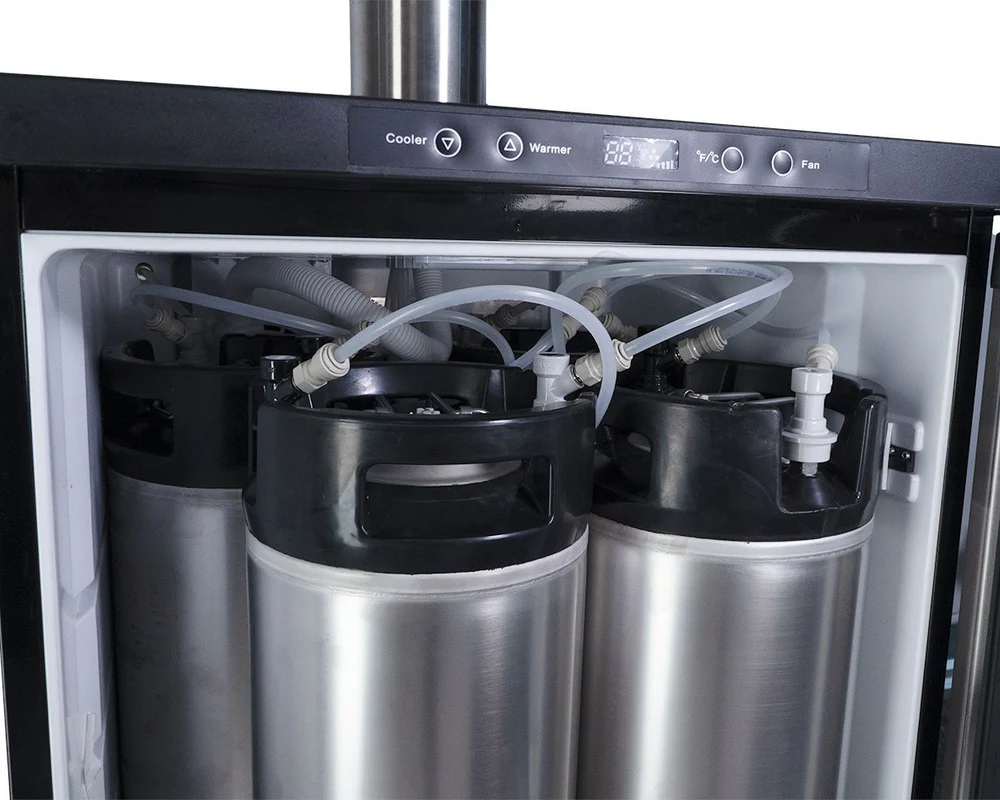
Diagram
Specifications
Climate Class: T (Tropical)- Refrigerant: R600a
- Rated Current: 0.80A
- Power: 85 Watts
- Capacity: 187L
- Voltage: 220-240V
- Hz: 50Hz
Installation & Setup
Remove and check all items from inside the kegerator
Remove any protective film and tape from the kegerator
Inspect kegerator for any damage that may have incurred in transit including liquid or oil marks inside packaging. If any damage is noted contact your retailer
Castor Wheels Installation
Make sure the kegerator is empty
Carefully lay the kegerator on its side on a soft surface such as carpet, cardboard or a towel. NOTE: Ensure the kegerator is tipped onto the right hand side (as seen from the front). Tipping the kegerator towards the inlet side of the compressor will decrease the chance of oil migrating into refrigerant line which can cause cooling and noise issues
Unscrew the feet from the base of the kegerator
Remove the screws in the base of the kegerator in each corner. These are pre-installed screws that are used to mount the castor wheels. NOTE: These can be quite tight from the factory. A 5/16″ socket or wrench will allow more leverage than a Philips driver if required
The two locking castor wheels should be installed towards the front of the kegerator
Position the kegerator back upright and leave for a minimum 1 hour before turning it on to allow the refrigerant gas to settle. If installing the castors shortly after receiving the kegerator, leave the kegerator upright for a minimum of 24 hours before turning it on
NOTE: The screw holes may be filled with foam and have a foil covering. If this is the case push and thread the screws through the foam or foil. The screw will then catch on the thread allowing it to be screwed in completely
Chrome Plated Guard Rail Installation
Position the guard rail so the feet line up with the holes in the top of the kegerator
Push the feet of the railing firmly into the holes

CO2 Cylinder Bracket Installation (optional)
Align the four holes in the bracket with the four studs on the back of the kegerator
Insert the studs into the holes and then push the bracket down firmly to secure it
Installing Regulator onto the CO2 Cylinder
Ensure the CO2 cylinder is off by turning the cylinder valve handle clockwise
Ensure the regulator dial is completely unscrewed and there is a nylon regulator washer between the type 30 nut and stem and the CO2 cylinder
Hand tighten the nut and stem onto the CO2 cylinder then tighten further with a 7 in 1 tool or a suitable wrench
Ensure the CO2 cylinder is off by turning the cylinder valve handle clockwise
Ensure the regulator dial is completely unscrewed and there is a nylon regulator washer between the type 30 nut and stem and the CO2 cylinder
Hand tighten the nut and stem onto the CO2 cylinder using the knurled grip. MK5 Regulators can be hand tightened due to the new spigot seal design that easily compresses
Connect gas & beer lines to coupler or disconnects
Please refer to the Keg Types guide for assembly instructions for the different types of beer and gas connections
Balance Beer Lines and Carbonation levels
Please refer to the Balancing Kegerator Lines & CO2 guide for details on getting the system balanced for a great pour
Leak & Pressure Testing
Important
Performing a CO2 leak test is important to ensure that your system will hold pressure and that there are no leaks in any connections in the system.
If there are any leaks this can result in the CO2 cylinder becoming empty in a short period.
Initial pressure testing can be performed in two different ways. If leaks are detected an Isolation Test can help determine the location of he leak.
Method 1 – Pressure Decay Test
Connect System
Attach all disconnects to an empty keg. If there is liquid in the keg this will give a poor reading as CO2 will become absorbed into solution
Set Pressure
Set the pressure on the CO2 regulator to 20psi. Wait for the empty keg to fill with CO2 to 20psi to ensure the system is properly pressurised
Turn CO2 cylinder valve off
Once pressurised, turn the valve handle on the CO2 cylinder clockwise until the valve is turned off
Check Pressure
Wait for at least two hours then check the pressure reading on the right hand (low pressure) gauge of the regulator
If the pressure reading has not changed (so is still reading ~20psi) then there are no leaks in the system
If the pressure has dropped a noticeable amount then it is very likely there is a leak in the system. Use Method 2 – Detergent Bubble Test to locate the leak. Note: Even if this test is passed it is quite a good idea to perform this test in any case
Method 2 – Detergent Bubble Test
Connect System
Attach all disconnects to an empty keg. If there is liquid in the keg this will give a poor reading as CO2 will become absorbed into solution
Set Pressure
Set the pressure on the CO2 regulator to 40-50psi. Wait for the empty keg to fill with CO2 to ensure the system is properly pressurised. Note: We use a higher pressure in order to make any leaks easier to detect. Ensure there is no beer in the keg as it may become over-carbonated
Check For Leaks
Using a soapy water solution (washing up liquid and water is perfect for this) in a spry bottle or simply dabbed on, check for leaks at all connections. The soapy water spray will slowly bubble if there are any leaks.
Connections to check include:
• The connection between the CO2 cylinder and the regulator • All duotight connections including the 8mm x FFL duotight connected to the regulator, ball lock disconnects and keg coupler, the 6.5mm x 8mm duotight reducers connected to the short shanks and the 8mm duotight tee pieces • Around ball lock disconnects and keg couplers when they are connected to the keg • Around the lid of a Cornelius keg • Make sure to remove the ball lock disconnects from the posts of the ball lock keg and check the post itself for leaks
IMPORTANT: Do not spray any duotight fittings with StellarSan or phosphoric acid solution to perform a leak test.
Perform a Pressure Decay Test
Once any leaks have been located and fixed, perform another Pressure Decay Test to ensure that the system holds pressure
Isolation Test
If any CO2 leaks are detected, if can be helpful to perform an Isolation Test to determine where the leak is in the system
Connect System
Attach all disconnects to an empty keg. If there is liquid in the keg this will give a poor reading as CO2 will become absorbed into solution
Set Pressure
Set the pressure on the CO2 regulator to 20psi. Wait for the empty keg to fill with CO2 to 20psi to ensure the system is properly pressurised
Isolate System
Once the system is pressurised, isolate each part of the system.
- Turn valve of CO2 cylinder fully off.
- Fully unwind the (anti clockwise) the regulator knob
- Remove Gas Disconnect from the keg
- (If using) Remove Gas Disconnect from gas inlet of kegerator
- (If possible) Weigh the CO2 cylinder
- Wait at least 12 hours
Test System
After at least 12 hours, if there is a leak in the system we can determine roughly where the leak is after isolating
- If the weight of the CO2 cylinder has gone down noticeably, the cylinder possibly has a leak
- If the pressure on the regulator has gone down, the regulator, gas line or fittings may have a leak
- Test the keg(s) by pulling the PRV. If no CO2 is released then the keg may have a leak.
- Once the general location of the leak has been determined by isolation testing, perform a Detergent Bubble Test in order to locate the leak precisely.
NOTE: It is safe to submerge duo tight fittings and EVA Barrier in water when locating leaks. Regulators cannot be safely immersed
Installation Diagrams
Single Tap Commercial Keg Installation Diagrams
Single Tap Commercial Keg Installation Diagrams

Single Tap Commercial Keg Installation Diagrams (Ball Lock Posts & Disconnects)

Single Tap Cornelius Ball Lock Keg Installation Diagram

Double Tap Cornelius Ball Lock Keg Installation Diagram

Triple Tap Cornelius Ball Lock Keg Installation Diagram

Quadruple Tap Cornelius Ball Lock Keg Installation Diagram

Troubleshooting
Beer is not pouring or not pouring well
Pouring too quickly
Beer Line may be too short. Please refer to this chart for a guide to recommended lengths for beer line of various diameter
CO2 pressure may be too high. Most short draw kegerator systems and beers are served at approx. 10-12psi. Please refer to this Carbonation Chart for more info
Beer may be over-carbonated. The keg will need to be de-carbonated by reducing excess CO2 pressure. Refer to this guide to fix over-carbonated beer
Pouring too slowly
CO2 pressure may be too low. Most short draw kegerator systems and beers are served at approx. 10-12psi. Please refer to this Carbonation Chart for more info
Beer Line may be too long. Please refer to this chart for a guide to recommended lengths for beer line of various diameter
Beer may not be fully carbonated. Leave the keg hooked up to CO2 until full carbonation is achieved.
Beer is too foamy/frothy
Beer may be over-carbonated. The keg will need to be de-carbonated by reducing excess CO2 pressure. Typically most beers in a short draw system are served at approx. 10-12psi. Refer to this guide to fix over-carbonated beer
Beer Line may be too short. Please refer to this chart for a guide to recommended lengths for beer line of various diameter
The beer lines may be frozen. If the beer line comes in contact with the cold plate in the fridge it can partially freeze the beer in the line. This creates turbulence in the line which can cause excess foam. Ensure the beer lines are not in contact with the cold plate.
Beer may be too warm. Increase the Set Point of the kegerator or leave the keg in the kegerator until it is fully chilled
Beer does not have enough head
Beer may not be fully carbonated. Leave the keg hooked up to CO2 until full carbonation is achieved. Please refer to this Carbonation Chart for more info
Beer Line may be too long. Please refer to this chart for a guide to recommended lengths for beer line of various diameter
Beer may be too cold. Increase the Set Point of the kegerator
(Homebrew) Beer may not have much head. Not all beer styles produce a lot of head – this may be due to the grist of the particular brew or possibly a brewing technique affected the head
No beer comes out of tap
Lines or connections may be blocked. If the beer contains a lot of hop matter there could be hop matter stuck in the liquid dip tube or liquid post of the keg. To fix this, release the pressure in the keg by pulling on the PRV. Remove the liquid post with a socket or spanner. Remove the liquid dip tube and ensure no hop matter is blocking the dip tube or the post
The beer lines may be frozen. If the beer line comes in contact with the cold plate in the fridge it can freeze the beer in the line and partially or completely block the flow. Ensure the lines do not come into contact with the cold plate
CO2 cylinder may be empty. If there is insufficient CO2 to pressurise the head space of the keg then beer will not pour. Replace or refill the CO2 cylinder if empty
Keg may be frozen. If the Set Point is too low or there is an issue with the temp probe calibration, the keg(s) may freeze. Check and correct the calibration and Set Point of the kegerator
Beer is too warm
Kegerator may not be cold enough. Check and adjust the Set Point of the kegerator. 2°C is typically the correct temperature to achieve a good pour
Keg may not be cold enough. Leave the keg in the kegerator until it is fully chilled. This can take up to 24 hours (for example) with a room temperature 50L keg
Kegerator may need calibrating. Check the actual internal temperature of the kegerator. If this is much higher than the indicated temperature then perform Offset Calibration to ensure the correct temperature is maintained
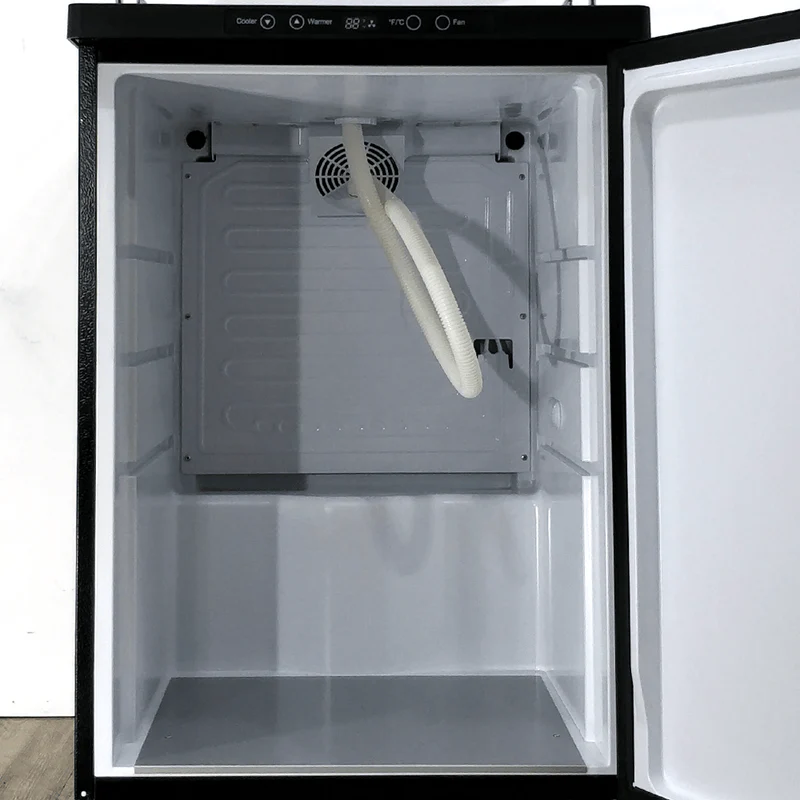
Font not cool enough. Direct the Font Fan tubing to the top of the font. Cut the Font Fan tubing to the correct length. Cut the tubing at a 45° angle to ensure it remains unobstructed. Ensure the fan is turned on
Gas Issues & Gas Leaks
CO2 Cylinder is empty
Cylinder may be used up. It takes approx 6g of CO2 to dispense 1L of beer at normal serving pressure. Thus, a 2.6kg CO2 cylinder will dispense approx. 8 x 50L kegs. More CO2 will be used if also carbonating the kegs. Refill the CO2 cylinder when empty
Possible Gas Leak. Perform an Isolation Test to check for potential CO2 leaks
Kegerator cooling issues
Kegerator not cooling to set point temperature
Insufficient clearance. A minimum of 100mm clearance is required on each side of the kegerator to ensure adequate heat dissipation for the condensers. Move the kegerator into open space to improve cooling efficiency
Ice build up. If there is visible ice build up on the cold plate this will act as an insulator and prevent the cavity of the kegerator from cooling properly. Defrost the kegerator by turning it off until the ice has melted. Note: Do not try to remove the ice physically as this may damage the refrigerant lines and is not covered under warranty
Door left open/not closed properly. If the door is not properly closed or misaligned the kegerator may not cool adequately. Ensure the door is closed and aligned properly
Not calibrated properly. If the kegerator is not cooling adequately but the compressor is cycling at the Set Point temperature the kegerator may require Calibration.
Hot environment. If you are in a very hot environment remove the font tube from the font tower and instead direct it into the kegerator to improve air flow throughout the fridge. This is because of ‘heat ingress’ into the system
Kegerator is too cold
Kegerator may need calibrating. Check the actual internal temperature of the kegerator. If this is much higher than the indicated temperature then perform Offset Calibration to ensure the correct temperature is maintained
Set Point temperature may be incorrect. Check the Set Point temperature. For best results set this to 2°C. Setting too low a temperature may cause freezing or performance issues
General Troubleshooting
Sides of kegerator are extremely warm
This is normal. The heat generated during refrigerant cooling is radiated from the left and right hand side of the kegerator. During normal operation these can get quite warm/hot. This is typically more apparent when the kegerator is cooling from ambient (so the compressor will be working harder and for longer). NOTE: It is vital that this unit has a minimum of 100mm clearance on each side for adequate cooling performance
Cannot adjust Set Point Temperature
Child Lock engaged. These have a built in Child Lock. To adjust the Set Point temperature, press and hold the Warmer button for 5 seconds until the display flashes (the displayed number is the current Set Point)
Excessive noise from fan
Ice build up. If there is visible ice build up there is likely also ice in the fan housing. The fan lades will hit this when spinning causing excessive noise. Defrost the kegerator by turning it off until the ice has melted. Note: Do not try to remove the ice physically as this may damage the refrigerant lines and is not covered under warranty
Black substance under cold plate
This is excess insulation. This is not uncommon in new kegerators after use. Excess foam insulation may drip from behind the cold plate. This is normal and nothing to worry about – simply clean with a damp microfibre cloth.
Loose wiring. It is possible for the lead to the fan to become slightly loose and contact the blades causing noise. Remove the fan housing and reposition the wire to prevent it from contacting the blades
No castor wheel screws
These are pre-installed. The castor wheel screws are installed in the underneath of the kegerator and simply need to be unscrewed with a 5/16″ socket or wrench, or Philips driver
Ice build up on cold plate
Moisture or humidity ingress. If the door is left open or the seals are damaged or dirty then ice can build up on the cold plate. If there is visible ice build up on the cold plate this will act as an insulator and prevent the cavity of the kegerator from cooling properly. Defrost the kegerator by turning it off until the ice has melted. Once defrosted, locate and correct the source of moisture ingress. Note: Do not try to remove the ice physically as this may damage the refrigerant lines and is not covered under warranty
EE Error
This is an electrical fault. This can be caused by a faulty Temperature Probe (Thermistor) or a loose connection or damaged or faulty connection. Try replacing the Temperature Probe. Inspect the board for loose or damaged connections
Front display flashing
Board Failure. This can indicate a failure of the front LCD Temperature Control board or the Main Circuit Board. Both boards are designed for easy replacement
No power to kegerator
The circuit may have tripped. Check that the beaker has not tripped. If it has, remove all other appliances form the circuit, reset the breaker and try again
Board failure. This can indicate a failure of the front LCD Temperature Control board or the Main Circuit Board. Both boards are designed for easy replacement
Water is leaking from kegerator
Melted ice buildup. If there is too much water, moisture or humidity ingress in the kegerator, the ice build up can overwhelm the evaporator plate at the rear of the kegerator. Defrost the kegerator (if necessary) by turning it off until the ice has melted. Once defrosted, locate and correct the source of moisture ingress. Note: Do not try to remove the ice physically as this may damage the refrigerant lines and is not covered under warranty
Kegerator Noise
Kegerators are not domestic fridges and thus will make noises that are quite different to a standard domestic fridge. A gurgling or similar noise is quite common and not considered unusual. The kegerators use a highly efficient refrigerant gas which can sound like gurgling. This is often more noticeable when the fridge is empty or the kegerator is brand new. Any noises are often reduced once the kegerator is filled with kegs due to the large thermal mass of the kegs.
Refrigerant noise is often more noticeable in a new kegerator, as it can take time for the coolant to settle.
To avoid excessive refrigerant noise, it is vital to leave the kegerator upright and undisturbed for at least 24 hours after transit.
In addition, if tipping the kegerator over (to install castors, for example) the kegerator must be tipped towards the right-hand side (as seen from the front). Tipping the kegerator towards the inlet side of the compressor will decrease the chance of oil migrating into refrigerant line which can cause cooling and noise issues.
Leave the kegerator upright and undisturbed for at least one hour before switching on after installing castors or tipping the kegerator for any other reason.